Laser Cutting
Week 2
For the 2nd lesson of CPDD, we will be mainly talking about
The Learning objectives of Week 2’s lesson
Introduction to laser cutting
Reflection on Week 2’s lesson
Learning objectives
The learning objectives of week 2 lesson is to
Explain how a CO2 laser cutter machine work
Describe the hazard and safety associated with the operation of laser cutter machine
List the materials that can be laser cut in FabLab SP
Explain the difference between raster and vector
Explain kerf and its impact in laser cutting
Introduction to laser cutting
How does a CO2 laser cutter work?
A CO2 laser is produced in a sealed glass tube mainly filled with CO2 and some nitrogen. High voltage electricity is passed through the tubes which increases the energy of the gas particles and produces an invisible beam of high power infrared light(laser beam). In order to move the laser in different directions, there are multiple mirrors that reflect the laser that exits at the end of the tube to the focusing lens and onto the workpiece. The focusing lens focuses the power of the laser beam into a single point in order to cut or engrave on the workpiece. The further away the focal point is to the lens,there will be less power hitting the workpiece making it harder to cut thicker objects.

Describe the hazard and safety associated with the operation of laser cutter machines.
Some of the things to avoid doing when using a laser cutter are
Avoid staring into the beam while cutting
Do not cut materials that contain chlorine or foam
Do not cut or engrave metals
Never leave the machine unattended while cutting/engraving.
If a small fire occurs, attempt to extinguish it by blowing it or removing material from a laser cutter.
If the material cannot be cut through, stop and check to ensure that the focus lens is clean.
Here are some materials we are able to work with in FabLab
Wood(Plywood, Natural wood, and MDF up to 6mm)
Acrylic (up to 5mm)
Cardboard (burnt marks and fire may occur)
Paper(Art card, Technical board)


Comparison of raster and vector graphics

Kerf and its impact in laser cutting.
Kerf is the width of material that is removed by a cutting process.
During the cutting process, if we program the laser cutting machine to cut 6”by 6” square and the laser cutter removes another 0.2” of material as it cuts, the resulting part is going to be 5.8”by 5.8”. Thus this would give us inaccurate cuts as it can be smaller or larger than the desired size we want which would affect our final end product.
Reflections on Week 2’s lesson
After going through this lesson, I have learned more about laser cutting in general and why it is important for us to learn about laser cutting.
Laser cutting allows us to be able to cut complex shapes without many tools and it is able to do it more precisely and quickly than conventional cutting tools which might be slower and not as precise. Laser cutting also allows us to cut very small or hard to cut shapes with precision which makes it more versatile than cutting tools. Besides that, the laser cutter is also able to reduce the wastage of material which is very crucial nowadays as we need to do our part to prevent global warming and climate change.It is able to also give us more consistent products compared to a human worker.
Laser cutting is currently being used in many industries to help boost productivity and optimize production lines and operating costs as it is cheaper, better, and faster than normal tools. Some industries that have implemented laser cutting are the automotive, jewelry, medical device manufacturing, and silicon manufacturing industries.
However, there are also some limitations to what the laser cutting machine is able to do with the current technology. For example, there is a very huge upfront cost of laser cutting machines, and laser cutting machines also produce dangerous fumes which require good ventilation to have a safe working environment. I believe with time and technology, these issues regarding the laser cutting machines will be addressed which will allow the laser cutting machine to be more powerful and versatile.
Laser Cutting Practical
For the laser cutting blog entry we are mainly going to talk about
Improved standard operating procedure in the operation of the laser cutter
Photos of laser cut pieces during the practical activity
Reflection on laser cutting experience
Improved standard operating procedure
Purpose
The purpose of this Standard Operating Procedure (SOP) is to describe the steps taken to operate the Epilog Laser Cutter Machine in the FabLab T11C.
Safety
Materials
Avoid cutting flammable materials to reduce the risk of fire. Avoid cutting metals. Also, do not use materials with chlorine or foam as they will release toxic gases when exposed to high temperatures.
Make sure the material thickness is no thicker than 5mm as the laser cutter cannot cut deeper than that.
General/Personal Safety
Do not lean over the cutter machine and stare into it when it is cutting. Staring into the laser while it is in operation can cause damage to the eyes.
Never leave the laser cutter unattended when it is operating. If the power settings of the laser are too high, the laser will cut through the material and concentrate on the case bottom of the laser cutter. It may cause damage to the exterior of the case bottom, fry electronic components and even start a fire
Do not have anything around the neck (e.g. lanyards) as it may cause the user to be entangled into the laser cutter. Long hair should also be tied up so that it does not get caught in the laser cutter machine.
Know the location of the nearest fire extinguisher to extinguish fire.
Laser Cutting Machine
Clean and vacuum the cutting deck and the internal cavity of the laser cutter regularly. Small particles of cut materials (e.g. sawdust) can ignite and cause explosions.
When opening the laser cutter, make sure the cover is opened fully.
Do not put your head inside the laser cutter when the cover is half-open.
Do not slam the cover of the laser cutter. Instead, close the cover gently. Ensure that the interlocking light on the side panel is lit.
Always check that the two LED lights on the side panel are on. This will tell us that the cover of the laser cutter is fully closed.
Procedure
Start-up
Step 1: Turn on the air compressor at the back of the laser cutter (red switch to position 1 or 2).

Figure 1:Picture of compressor
Step 2: Turn on the fume extractor (green button, left side of machine).
Turn on the fume extractor by pressing the green button and ensure that the green light is on.

Figure 2:Picture of back of fume extractor
Step 3: Turn on the on-off switch (black switch, bottom right corner of machine). Wait for the laser cutter to finish the initialisation process.

Figure 3:Picture of laser cutter switch
Step 4: Once the laser cutter is fully set up, head over to the workstation to send the 3D drawing to the laser cutter.
Operation
Step 1: Use vernier calipers to measure the thickness of the material.
Step 2: Open coreldraw and start a new document
Step 3: Open the imported DXF or SVG file in CorelDraw by clicking file >import
Step 4: Select the part to be cut/engraved/etched.
For parts to be cut, the colour of the border should be red, and its line weight should be hairline.
For parts that will be engraved, the colour of the border should be green, and the part to be engraved should also be filled green.Click the items you want to engrave and click the colour green on the bottom left of corel draw to fill the object.
For parts that will undergo scoring, the colour of the border should be green, and it should have a line weight that is hairline.
Table 1: Summary of CorelDraw functions
Step 5: Once the parts to be created have been selected, send the file for printing (top left corner, fourth icon).
Step 6: Place the item to be cut into the laser cutter and align it with the ruler in the laser cutter.
Step 7: Ensure that design is aligned by referring to the ruler in the software on the top and left corner. Ensure that the design and the item to be cut are aligned.
Step 8: On the new interface, turn on “Auto Focus”. For the Epilog M2 machine, “Auto Focus” must be set to “ON”, while for the Epilog Pro machine, it must be set to “THICKNESS”.
Step 9: Turn on “Air Assist”.
Step 10: Import material settings to select the type of material that will be cut, and key in the thickness of the material.
For engraving, select “Engrave”.
For cutting, select “Vector”.
Step 11:Set the Speed to 20, Power to 80 and thickness based on what you measured earlier.
Step 12: Once complete, click “Print” (bottom right corner). This will send the file to the laser cutter.
Step 13: Load the material to be cut into the machine.
For Epilog Fusion Pro, adjust the material such that it is being cut at empty spaces, to help save material.
For Epilog Fusion M2, adjust the objects using the mouse tool on the left bar and adjust based on the location of the 2 rulers on the top and on the left.
Step 14: Check that the name on the laser cutter display screen is the same as the file name on the Epilog dashboard. Take note of the estimated time required for cutting.
Step 15: On the Epilogue Fusion M2 machine, press “Go” to start the cutting process. On the Epilogue Fusion Pro machine, press “Play”.
Step 16: Once the laser cutting process is complete, let it rest for 1 minute inside the laser cutter to let it cool down.
Step 17: Open the laser cutter and remove the cut material.
Table 2: Summary of Epilog Dashboard Functions
Shutdown
Step 1: Once the laser cutter machine has cooled down, turn off the on-off switch.
Step 2: Switch off the fume extractor.
Step 3: Switch off the air compressor.
Step 4: Clean up the interior of the laser cutter machine, as well as the surrounding area. Ensure that there is no dust or scrap materials left behind.
Photo of laser-cut piece during practical activity
During the preparation of this practical, we initially designed a birdhouse using a parametric design to be laser cut.

Figure 4:Birdhouse design in Fusion 360
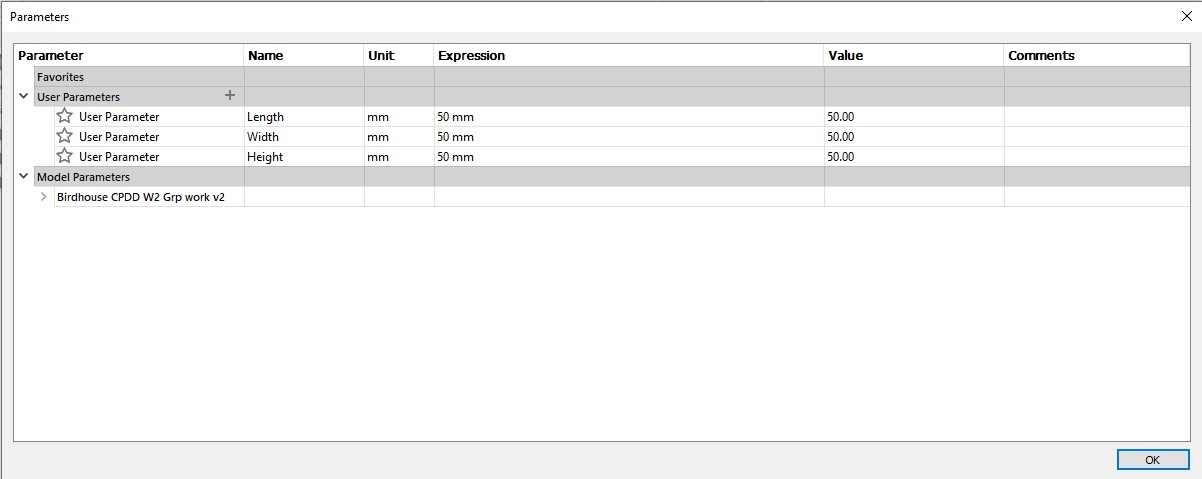
Figure 5:Parametric values of Birdhouse
This was the design that we prepared beforehand for the practical but we had an error as we did not add the parametric dimension for the thickness of the slots. This threw us off our plans and we needed to come up with something within that short period of time to at least have an experience of laser cutting.
During the short amount of time left to design and laser cut our design, we decided to design something easy to produce. We designed a wooden chest/cuboid that only requires two different parts. This only took us 10mins to design as we have been using Fusion 360 quite often and we are quite used to making/designing things.

Figure 6: Wooden Chest/Cuboid parametric design
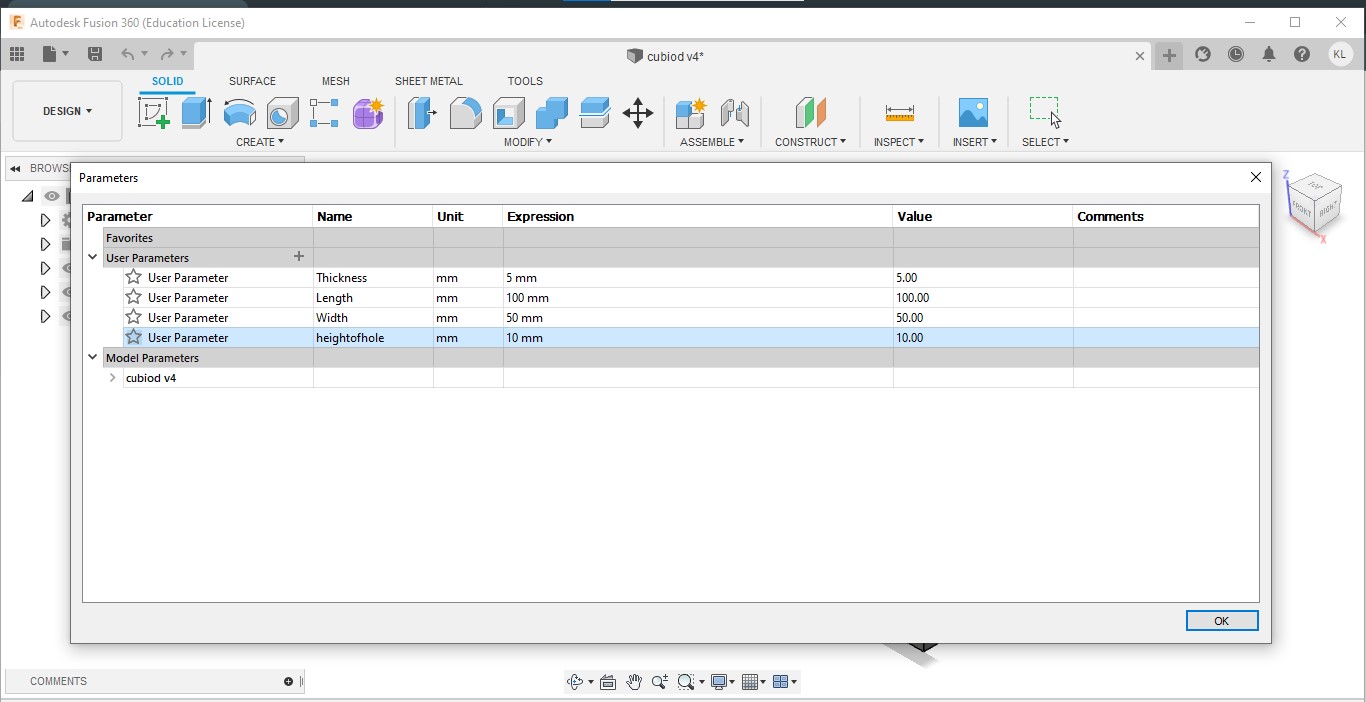
Figure 7: Parametric values of wooden chest/cuboid
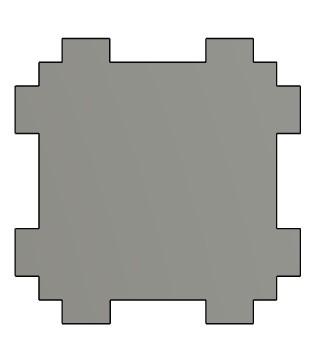
Figure 8: Front and back piece of the cuboid in Fusion 360

Figure 9: Length piece of the cuboid in Fusion 360

Figure 10: Image of our final product after laser cutting and assembling it
This is a short video on the laser cutter in action
Reflection on laser cutting activity
This was the first time using the laser cutting machine and seeing it in action. It was an eye-opening experience for me as I managed to operate the laser cutting machine successfully and the group was able to cut out a simple design we created on Fusion 360. The multiple pieces cut by the laser cutter were able to come together to make a cuboid.
From this activity, I have learned how to import a design that I created on Fusion 360 to the laser cutter. This is done by saving the sketch I want to cut out as a DXF file and then importing it into Coreldraw and then making the outline red, hairline to cut the design out. At the start, I did not know this and saved the whole fusion 360 as a DXF file and imported it into the Coreldraw which turned out to be the wrong thing to do. I also managed to operate the laser cutter machine which is important for us as it is able to help us in our FYP project. I also learned that in order for the laser cutting machine to work safely, a fume extractor and a compressor are also needed to remove toxic fumes from being released to the nearby surroundings.
Besides that, I also learned that we have to consider all perspectives when designing a parametric design. For example, the length of the slot of one part is directly related to the thickness of the materials. We need to consider this to ensure that we are able to have a laser-cut piece that is able to fit nicely. This would be particularly important when we are making use of multiple parts to form an object.
This practical allowed me to use the knowledge I gained from the tutorial lesson and apply it in my work. Hence, in the future, I am more confident in doing laser cutting for my group work.

Comments
Post a Comment